How to Measure the Cutout for a Built-In Grill
DIY projects are fun! They offer a great sense of accomplishment. Better yet, when done correctly the first time — they save money! Constructing an outdoor kitchen yourself is no stranger to all three checkmarks. Start with an unfinished BBQ island kit to make it that much simpler: easy to build, a bundle of savings (both time and money), and a cakewalk for design planning with their modular structures.
So, where does the grilling come into play? Through the magic of a built-in gas grill, which slides straight into a slot cut into that BBQ island. That cut is where the “cutout” in that title comes from; part of the outdoor kitchen island must be appropriately measured and cut away to make room for the grill insert. Depending on whether you use a ready-to-assemble island or build the island yourself, this may happen at different stages of the process.
Steps to Measuring the Cutout for Your Built-In Grill
So, you’ve got your BBQ island (coming together nicely, isn’t she?). You might even have your grill! Here’s how you come that much closer toward grilling paradise:
-

-
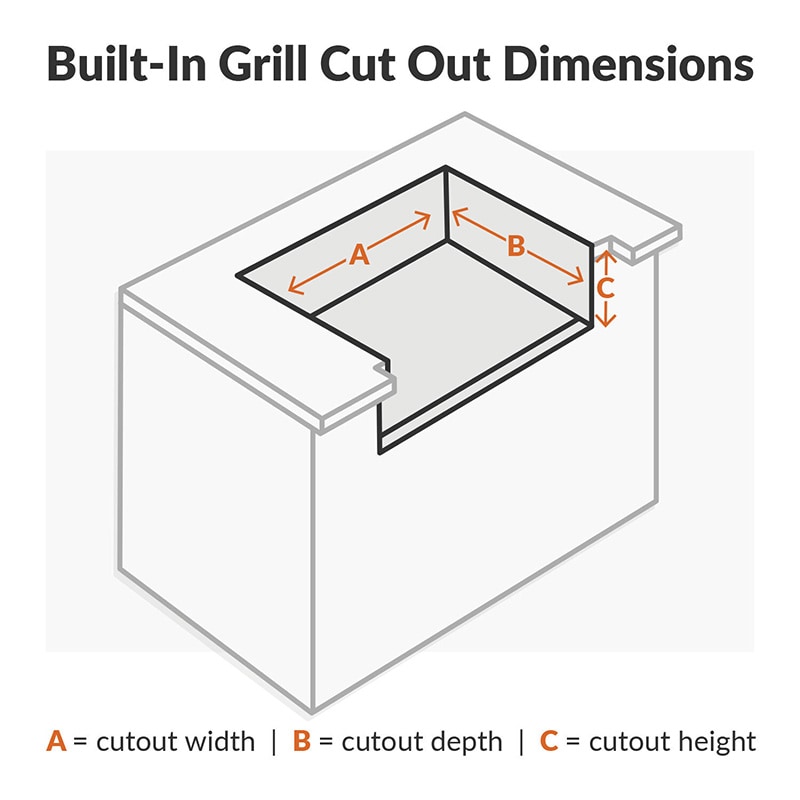
Step 1 — Find the “Cutout Width” (A). This is the width for the slot of your grill head. What happens here is that your grill will sit on the ledge to either side of this cut as you slide it into place. Figure out exactly where you want your grill to go, locate the center-point, then measure out half the width to either side. Easy stuff!
Step 2 — Find the “Cutout Depth” (B). This is how far backward you should measure from the front lip of your island to make your cut. Another way of looking at this? How far back your grill will perch once you’ve slid it into place. You don’t want it jutting out too far (not great for the hip), nor do you want it sinking too far in — like a remote in your couch.
Step 3 — Find the “Cutout Height” (C). This is how far down the grill head will sit once in place. Traditionally, this depends mostly on the height of the control panel and whether or not your chosen grill head boasts a drip pan or other features that extend its height. Very important: if your countertop isn’t installed yet, don’t forget to factor in that additional height! Additionally, cutout height dimensions almost always include a small gap under the grill for airflow — you do not want to cover that up.
Step 4 — Once all measurements are made (remember: measure twice, cut once), you’re ready to start making those cuts! Pro tip: be sure to wait until the gas grill arrives first. After all, if you decide a different grill fits your needs after you’ve made your cuts… Well, you can certainly return a side burner or a grill, but you can’t return the material already cut out of your granite.
-

Extra Credit: Insulated Grill Jackets
Building your BBQ island from materials that can catch fire? We bet this is the part where you expect us to tell you that you can’t. Nope! You can, if (very big if) you do so safely. Using combustible materials to build your BBQ island means every cooking appliance must use an insulated jacket. We put that in bold because that’s how important it is — we don’t want your outdoor kitchen burning down, and neither do you. Our awesome advocates against accidental arson assembled an Insulated Grill Jacket Buying Guide that can set the record straight on whether or not you need one.
Bring Your Outdoor Kitchen Dreams to Life
Now that you have the know-what, get the know-how! Need a helping hand? The experts behind our Free Outdoor Kitchen 3D Design Services make an incredible support network, helping you through every step of the process with high-quality renderings.
View on BBQGuys.com

Comments
0 comments
Please sign in to leave a comment.